

To avoid installation and/or operational problems, ensure that your computer
meets the following minimum system requirements based on your Operating
System.
Operating System System Requirements
Windows 3.1/3.11
Windows NT
Macintosh
NOTE: Macintosh users should skip to Step 3: Connecting the SCSI
Devices
Before proceeding with the installation of the JVC CD-R system, verify
that your computer meets the minimum system requirements for your respective
operating system.
If your system does not already have an Adaptec SCSI host adapter, you
must install one.
If your PC already has an Adaptec SCSI host adapter you may use that SCSI
host adapter. Consult the manual supplied with your host adapter to connect
the JVC CD-R system or install the SCSI host adapter supplied with the
JVC CD-R system.
Adaptec provides a number of host adapters. For example:
For specific information about the card you are using, refer to the Adaptec
manual for instructions on changing the settings.
![]() For
Windows NT users, please read about your specific SCSI host adapter under
section 17
For
Windows NT users, please read about your specific SCSI host adapter under
section 17
of the Read Me file which is in the Main Program Group. It briefly explains
possible conflicts that might arise with certain hardware configurations.
Do not continue past this point until you have read and understand the
section pertaining to your specific Adaptec SCSI host adapter.
1. Power down the PC and disconnect the power cord.
2. Remove the cover of the PC.
3. Insert the card into an available and compatible slot in the
computer, and make sure the host adapter is securely seated into the appropriate
slot. Make sure the settings (IRQ, I/O Address, DMA) for the SCSI host
adapter are unique and the settings do not conflict with any other device.
![]() If
you are using multiple SCSI host adapters, each card must have unique I/O,
DMA, and
If
you are using multiple SCSI host adapters, each card must have unique I/O,
DMA, and
IRQ settings. For specific information about the card you are using, refer
to the SCSI host
adapter documentation for details on changing the settings.
4. Reboot your PC to determine whether installing this card has
affected the performance of any other piece of hardware connected to it.
![]() If
your machine hangs while booting, or if a peripheral that worked before
no longer operates
If
your machine hangs while booting, or if a peripheral that worked before
no longer operates
properly, the host adapter installed conflicts with another card and/or
device. You will need to
change the hardware settings on the SCSI host adapter. For specific information
about the card
you are using, refer to the host adapter documentation for details on changing
the settings.
Many cards on an AT bus (i.e. network card or SCSI card) often use IRQ
numbers and/or host adapter port addresses to communicate with your PC.
Occasionally, there may be a conflict between the default IRQ number and/or
host adapter port address of the SCSI card and that of an existing card
in the machine. To correct this problem, you must change the SCSI card
configuration so it has settings that are different from any others on
the bus.
Depending on what type of SCSI host adapter you are using, these settings
can be modified by changing jumper settings on the SCSI host adapter itself,
or by changing the BIOS settings for the SCSI host adapter. For specific
information on how to modify the card's settings, please refer to the card's
documentation for details.
To connect the SCSI device to the computer:
1. Set unique SCSI IDs for each device.
2. Physically connect the devices.
3. Properly terminate the SCSI bus.
Setting Unique SCSI IDs for Each Device:
If you plan to attach multiple devices to a single card, you must select
a unique SCSI ID for each device. On the JVC CD-R system, the SCSI ID can
be changed by setting jumpers on the internal CD-R drive or using either
a push button or a dial selector (located on the back of the JVC CD-R system).
On a PC, you may have installed one or more SCSI adapters within the PC.
Each adapter has an ID of 0, 1, 2, or 3. Note that you do not set these
card numbers-they are determined when you boot the machine.
NOTE: For a PC, typically only SCSI ID numbers 0 through 6 are valid for these devices because the SCSI Host Adapter uses SCSI ID #7 by default. If you are booting the PC from a SCSI hard disk, the SCSI hard disk will typically have a SCSI ID of 0 or 1.
![]() For
a Macintosh, you should never set a SCSI ID to 0, 3 or 7. These SCSI ID's
are typically
For
a Macintosh, you should never set a SCSI ID to 0, 3 or 7. These SCSI ID's
are typically
used for internal SCSI devices such as the system's bootable SCSI hard
disk, an internal SCSI
CD-ROM drive, and the Macintosh motherboard.
The JVC CD-R system comes configured with the following default SCSI IDs:

If you have a JVC Tower system with a JVC DATA/DAT drive, the DATA DAT
drive is set at ID #4.
You can change the SCSI ID of the devices in the JVC CD-R system.
NOTE: Be aware that the JVC CD-R system must be powered off and on again for the changes to take effect. Be careful not to set the SCSI ID to that of an existing device and remember that SCSI ID #7-#9 cannot be used.
Poor SCSI cabling is one of the most common, yet easily preventable
SCSI problems. Therefore it is important that you use premium SCSI cables.
If you are using SCSI cables other than your JVC SCSI cables, check that
the cables you are using conform to the following standards:
You can purchase additional premium SCSI cables through your local JVC
reseller or through JVC directly.
Daisy-Chaining devices is the act of connecting all SCSI devices to
the same SCSI bus. Each device on the same SCSI bus must have a unique
SCSI ID.
1. Connect one end of the SCSI cable to the back of the JVC unit.
The JVC external CD-R system has two SCSI connectors; connect the SCSI
cable to either one.
2. Connect the other end of the SCSI cable to the newly installed
SCSI card. For Macintosh/Power PC users, connect the cable to the SCSI
port on the back of your Macintosh/Power PC Computer.
3. You need to attach the JVC CD-R system to the SCSI port on the
back of your computer, unless you already have another SCSI device connected
to your computer. If you have other external SCSI devices that you want
to connect in addition to the JVC CD-R system, you will need high quality
premium SCSI cable(s).
4. Connect the external SCSI terminator delivered with the JVC CD-R
system to the empty SCSI connector on the back of the JVC unit . However,
if the JVC CD-R system is not the last device, make sure the last device
on the physical SCSI chain (the device with a free SCSI connector) is terminated.
5. Attach the power cord to the JVC CD-R system, then connect the
plug to an outlet. Power on all SCSI devices and then your computer.
NOTE: We recommend that you do not open the JVC CD-R system unless you absolutely have to. Opening the JVC CD-R system will void your warranty.
NOTE: If you connect the JVC CD-R system in a chain with other SCSI devices, we recommend that it be the first device on the SCSI chain.
NOTE: If you have a Macintosh IIfx, you must use the special black terminator provided by Apple when you purchased your computer
![]() If
your machine hangs while booting, or if a peripheral that worked before
no longer operates
If
your machine hangs while booting, or if a peripheral that worked before
no longer operates
properly, then the host adapter and/or devices installed conflict with
another card/device. If
your computer does not startup properly, power off all SCSI devices, make
sure there are no
SCSI ID conflicts (no devices set to the same SCSI ID), power on all SCSI
devices and restart your computer. If you continue to have problems, attach
one device at a time to find the one
device that is causing the problem, or refer to the SCSI host adapter manual
for assistance.
Hardware installation is now complete.
NOTE TO MACINTOSH USERS:
Macintosh users should insert the Archiver or RomMaker Plus CD-ROM into a CD-ROM drive attached to the Macintosh, and open the "MacintoshDemo" folder. Once within this folder, double click the "ArchjectorMac" or "RmkrjectorMac." This will display a brief multimedia tutorial of the Personal Archiver's or RomMaker's functionality. Once you have viewed this tutorial, drag the Archiver or RomMaker folder to your desktop or any hard disk volume. Be sure to also read the ReadMe file on the CD. It contains important information that you should be aware of.
Once you have viewed the Personal Archiver or RomMaker tutorial demo and read the "ReadMe" file, you are ready to launch Archiver or RomMaker. At this point, you should turn to "Launching Archiver or RomMaker" found in Chapter 1 of the Personal Archiver or RomMaker for Macintosh manual.
If you do not have a CD-ROM drive already attached to your Macintosh, please contact JVC at (714) 261-1292 for a floppy version of the Macintosh software.
After you connect and configure the appropriate hardware and install the
Adaptec SCSI host adapter, you are ready to install the Adaptec EZ-SCSI
software. This procedure is explained in detail below. Follow these instructions
in the order that they appear throughout this section.
After you connect the JVC CD-R system and SCSI hard disk(s) to your
PC, you must now install the SCSI drivers. Installing the SCSI drivers
require three basic procedures:
1. Run the Adaptec EZ-SCSI setup
2. Edit the CONFIG.SYS file
3. Edit the AUTOEXEC.BAT file.
![]() Make
sure you connect all devices to your PC and power them on before running
Adaptec's
Make
sure you connect all devices to your PC and power them on before running
Adaptec's
EZ-SCSI setup. When you run the setup program, it will detect the devices
connected and
automatically modify your CONFIG.SYS and AUTOEXEC.BAT files appropriately.
The EZ-SCSI software from Adaptec will automatically add the following to your CONFIG.SYS and AUTOEXEC.BAT files:
You must run SETUP found on disk 1 of the "JVC Adaptec EZ-SCSI V4.00"
or higher diskette before you run the Personal Archiver or RomMaker SETUP
program. Refer to the Adaptec documentation for details on running EZ-SCSI
for Windows.
If you connected the JVC CD-R system and one or more SCSI hard disks before
running EZ-SCSI, your CONFIG.SYS file should contain lines similar to the
following after you run the setup program:
DEVICE=C:\SCSI\ASPI2DOS.SYS /Z /D /PAUSE
DEVICE=C:\SCSI\ASPIDISK.SYS /D
DEVICE=C:\SCSI\ASPICD.SYS /D:ASPICD0
NOTE: If these changes were not made, you must add these lines to your CONFIG.SYS before proceeding. Please note that a number of different host adapter drivers may be used, (i.e. ASPI4DOS.SYS or ASPI8DOS.SYS, etc.) depending on which model of the Adaptec SCSI host adapter you are using. Please refer to the Adaptec documentation for further details on which is the proper driver for your host adapter.
You must reboot your PC in order for the new SCSI device drivers to
take effect. At boot time, each SCSI device is identified by the host adapter
and displayed on your screen. Make sure the SCSI hard disk(s) and the JVC
CD-R system are identified.
The following is an example of what you should see on your screen when
the computer reboots:
![]() If
all SCSI devices are properly displayed, (shown in bold in the above examples)
and the PC
If
all SCSI devices are properly displayed, (shown in bold in the above examples)
and the PC
boots successfully, please proceed to the next step of setting up the DOS
drive letters for all
CD drives.
If you do not see any devices being recognized by the host adapter on startup,
(as in the above examples) make sure all external SCSI devices are powered
on, then reboot.
This is the most common reason for failure in outputting data to SCSI devices
when you use the Personal Archiver or RomMaker. In this case, your host
adapter shows that it cannot locate any SCSI devices.
If you see this error:
When you boot the PC, there is a more serious problem. First, power off
the PC and then power it back on. If you still get this message, it is
likely that the SCSI card has a conflict with either the IRQ setting and/or
the host adapter I/O address. You will have to change either or both of
these settings in order to use the adapter. For details on how to change
these settings, refer to the host adapter installation guide.
![]() With
some Adaptec SCSI host adapters, if you change the IRQ number and/or host
adapter
With
some Adaptec SCSI host adapters, if you change the IRQ number and/or host
adapter
port address, you must modify the device driver arguments in the CONFIG.SYS
file to notify to
the SCSI driver of these non-default values. See your Adaptec Hardware
Installation Manual
for details.
If you purchased the JVC Personal Archiver or RomMaker System with the SCSI hard disk option, then the SCSI hard disk has already been set up properly. There is no need to re-format or re-partition this SCSI hard disk. If you plan to use a hard disk that is already configured for your system, no changes need to be made. If you can not access the SCSI hard disk, make sure that the ASPIDISK.SYS driver is specified in your CONFIG.SYS file and/or use ADAPTEC's AFDISK.EXE utility to partition the drive.
Now that the SCSI drivers are properly installed, and a reboot of the
PC has been done, the hardware configuration is complete! There should
be a drive letter assigned to all newly installed SCSI drives. If you do
not have any CD-ROM drives attached to your PC, (not including the JVC
CD-Recordable Drive) please skip down to step #4.
1. If you have other CD devices attached to your PC, you will need
to modify your AUTOEXEC.BAT to include these other devices.
For example, your AUTOEXEC.BAT file might have a line similar to:
C:\SCSI\MSCDEX /D:TOSHIBA /L:G
NOTE: The line may have a different path to the file and/or device name, but the line should still contain MSCDEX or MSCDEX.EXE
NOTE: If the previous statement contains "REM" in front of it, proceed to step #3.
2. The "/D:TOSHIBA" is the device name for a pre-existing
CD device. You should modify the AUTOEXEC.BAT file (with a text editor,
i.e., EDIT AUTOEXEC.BAT) to read:
C:\SCSI\MSCDEX /D:TOSHIBA /D:ASPICD0 /L:G
Once you have finished editing the line:
You should now be able to access both the pre-existing CD-ROM drive,
as well as the JVC
CD-Recordable drive as a reader. Proceed to step #4.
3. If you have two lines that contain MSCDEX, and one of the lines
contains "REM" at the beginning of the line, ( a "REM"
statement prevents a line from being processed by the startup sequence)
it is very likely that this line was previously loading before running
the Adaptec EZ-SCSI setup program.
In order to get the JVC CD-Recordable drive and any other CD-ROM drive(s)
working together properly, you must do the following:
a. Open the AUTOEXEC.BAT file with a text editor such as EDIT
b. Add the device name parameter (/D:[DeviceName]) of the line that
does have "REM" at the beginning, to the line that does
not contain REM at the beginning. For example, before any changes
are made, you should have two lines in your AUTOEXEC.BAT file that are
similar to this example:
C:\SCSI\MSCDEX /D:ASPICD0 /L:G
REM C:\DOS\MSCDEX /D:TOSHIBA /L:G
c. Once you make the changes, the two lines should appear similar
to this example:
C:\SCSI\MSCDEX /D:ASPICD0 /D:TOSHIBA /L:G
REM C:\DOS\MSCDEX /D:TOSHIBA /L:G
d. Once you save these changes and reboot the PC, you will have
access to all CD devices through DOS drive letters.
4. You are now ready to proceed with the installation of the Personal
Archiver or RomMaker software, which is found in Chapter 2: "Getting
Started" of the Personal Archiver or RomMaker Plus for Windows manual,
under "Running the Setup Program."
After you connect and configure the appropriate hardware and install the Adaptec SCSI host adapter, you are ready to install the Adaptec EZ-SCSI software. Please take note that installing the Adaptec EZ-SCSI software is optional. However, JVC does recommend that you install this software. This procedure is explained in detail below. Follow these instructions in the order that they appear throughout this section.
1. After you connect the JVC CD-R system and any SCSI hard disk(s) to your PC:
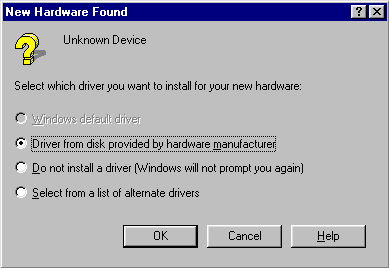
2. Once you are within Windows 95
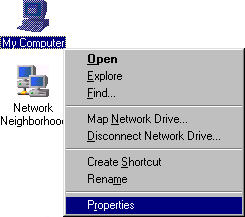
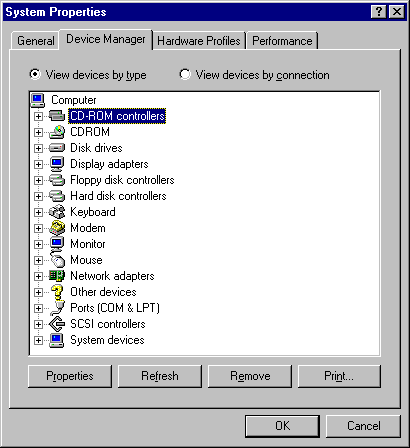

3. If the SCSI icon shows a problem, (see fig. #5) this can indicate
one or more of the following:

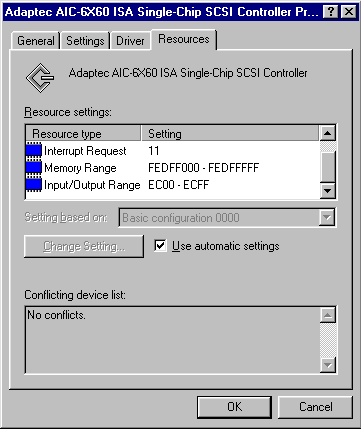
f. Check the "Conflicting device list" box on the lower part of the window. This box should show any known problems, (see fig. #6) such as:
If this box shows a conflict with another device, the host adapter settings
must be changed so that it does not show a conflict. To adjust these settings,
refer to your Adaptec Hardware Installation Manual for details.
![]() Make
sure you connect and power on all SCSI devices before running Adaptec's
EZ-SCSI setup.
Make
sure you connect and power on all SCSI devices before running Adaptec's
EZ-SCSI setup.
You should run SETUP found on disk 1 of the "JVC Adaptec EZ-SCSI
V4.00" or higher diskette before installing any other JVC software.
To install, follow these few steps:
1. Insert floppy diskette #1 of the Adaptec EZ-SCSI software.
2. Click on the Windows 95 "Start" button and select "Run..."
3. Type A:\SETUP in the "Open:" section, and hit
return.
The setup process will guide you through the rest of the installation process
of the EZ-SCSI software. Once the setup process has finished, you are now
ready to proceed with the installation of the Personal Archiver or RomMaker
software, which is found in "Chapter 2: Getting Started" of the
Personal Archiver or RomMaker Plus for Windows manual, under "Running
the Setup Program".
After you connect and configure the appropriate hardware and install the Adaptec SCSI host adapter card into the PC, you are ready to install the Adaptec EZ-SCSI software. Please take note that installing the Adaptec EZ-SCSI software is optional. However, JVC does recommend that you follow through with the installation of this software. This procedure is explained in detail below. Follow these instructions in the order that they appear throughout this section.
Now that you have read and understand the section about your Adaptec
SCSI host adapter in the "Read Me" file, you are now ready to
install the host adapter drivers.
1) Adding Windows NT driver support for the Adaptec Host Adapter
2) Confirming Correct Hardware Configuration Through Windows NT
If this box shows a conflict with another device, (see fig. #7) the host
adapter settings must be changed so that it does not show a conflict. To
adjust these settings, refer to your Adaptec Hardware Installation Manual
for details.
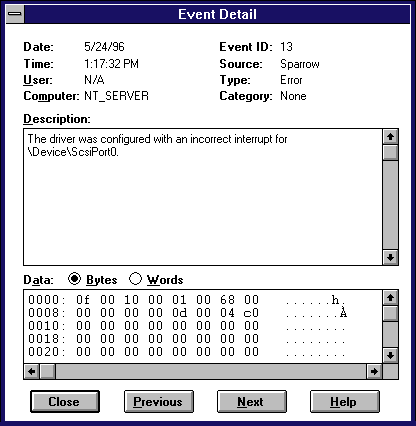
Figure 7
3) Running the Adaptec EZ-SCSI Setup for Windows NT
You should run SETUP found on disk 1 of the "JVC Adaptec EZ-SCSI
V4.00" or higher diskette before installing any other JVC software.
To install, follow these few steps:
a. Insert floppy diskette #1 of the Adaptec EZ-SCSI software.
b. In File Manager, click on "File," then select "Run..."
c. Type A:\SETUP in the "Command Line:" section,
and hit return.
The setup process will guide you through the rest of the installation process
of the EZ-SCSI software. Once the setup process has finished, you should
now proceed with the installation of the Personal Archiver or RomMaker
software, which is found in Chapter 2: "Getting Started" of the
Personal Archiver or RomMaker Plus for Windows manual, under "Running
the Setup Program."
For further information or the name of your nearest dealer or distributor,
please contact:
JVC Professional Computer Products Division:
5665 Corporate Ave.
Cypress, CA. 90630
TEL: (714) 816-6500
FAX: (714) 816-6524.
Or simply send us an e-mail. Click
here![]() to go to our Feedback screen.
to go to our Feedback screen.

Company/Sales Info | News
Updates | Support/Service Info
CD-Recording | CD-ROM
Access | Wireless LAN